
- Decorating jack-o’-lanterns offers opportunities for children to explore early math concepts like shape, size, and measurement.
- You can do this activity with things commonly found at home and in classrooms—no pumpkin required.
- Explore more ideas for incorporating math into pumpkin designs in this handout.
Whether creating Halloween decorations for your home or classroom, incorporating pumpkin design into your activities offers many opportunities to develop early math skills. Children can practice shape, measurement, and spatial skills while designing the face of a jack-o’-lantern. You don’t even need a real pumpkin for this fun math activity. Use things that you already have on hand, such as scrap paper and repurposed containers, to design a jack-o’-lantern and engage in math learning together.
Pumpkin Design Activity Instructions
To be sure, carving pumpkins can be messy and difficult, and traditional pumpkin carving tools are not appropriate for young hands. Instead, you and your children can design a jack-o’-lantern with washable markers applied directly to the pumpkin. Another idea is to paste or trace shapes onto a pumpkin, piece of paper, or things that otherwise might end up in the recycling bin. For example, you can use plastic lids from empty oatmeal containers as the pumpkin and cut out the shapes from leftover envelopes that came in the mail. Here are the instructions for designing a jack-o’-lantern with a focus on math exploration.
Step 1: Gather the materials.
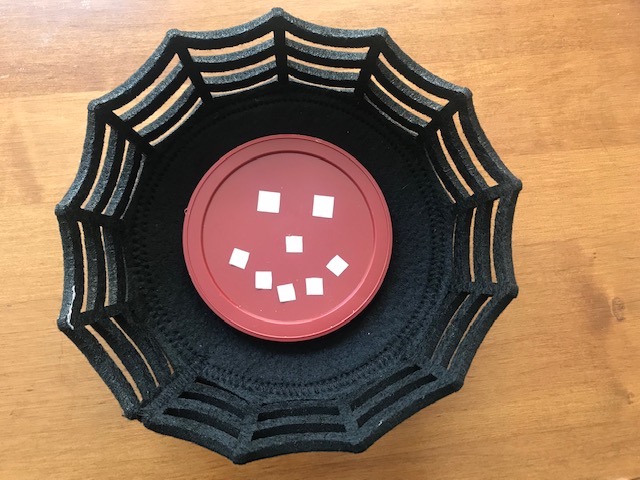
Choose what will serve as your pumpkin base—an actual pumpkin, a piece of paper, or some other object. You’ll need paper, scissors, and a measuring tool, such as a ruler or measuring tape. The ruler will help you cut equal sides for the squares and decide how big to make your shapes. Have tape or glue ready to affix the shapes to your pumpkin. Washable markers are optional for tracing shapes and adding embellishments.
Step 2: Create an assortment of shapes.
Cut or draw the shapes that will be used to build your jack-o’-lantern. For tips on what shapes to include, download and print our handout.
Preparing the shapes opens opportunities to engage in conversations around key early math concepts, including:
- Size. What will fit on your pumpkin?
- Number. How many triangles will we need to make the eyes and nose?
- Estimation. About how many triangles do you think we will need to make a mouth out of triangles?
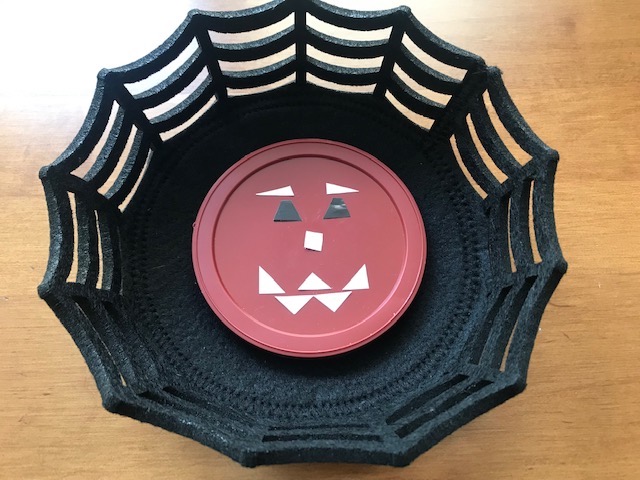
Step 3: Design the jack-o’-lantern face.
Planning around and arranging the shapes invites conversations about:
- Shape. What shape should we use for the nose?
- Shape attributes. These rectangles are different. How come they are both rectangles?
- Distance. How far apart should we place the eyes?
- Spatial relations. The nose goes in the middle of the pumpkin. The eyes are above the nose. If we rotate the shape, the nose looks different.
- Size. Is the nose triangle bigger or smaller than the triangles we used for the eyes?
- Number. How many squares will fit where we want to make the mouth?
Adaptation Ideas to Support Learning
To extend children’s math learning and offer different challenges, try these ideas:
Create several jack-o’-lanterns and use just one different shape for each. In the end, you could have a jack-o’-lantern made entirely of triangles, another one made of squares, another one made of octagons, and another one made of trapezoids.
If there is more than one child, consider giving each child the same combination of shape pieces but keep the design open-ended. See all the different ways they create jack-o’-lantern faces!
A jack-o’-lantern usually has two eyes, one nose, and one mouth. There’s nothing wrong with this classic design, but you can engage children in deciding whether to add additional flair: A third eye? Drawn-on ears? Hair, and if so, will the hair be made with straight, curvy, curly, or zigzag lines?
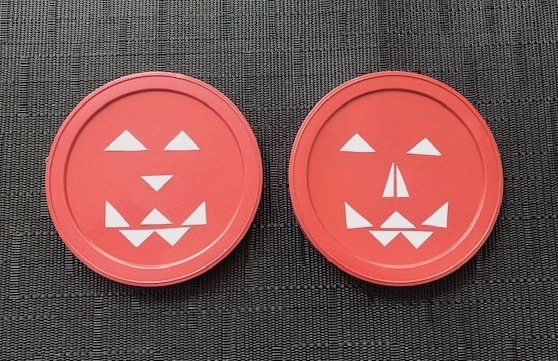
Help children build new, complex shapes out of the shapes they already have. Overlapping triangles and squares can create different looking eyes and mouths. For example, see how different the two jack-o’-lanterns pictured on the right look just by changing the kind of triangles we used to make the noses.
Pumpkin decoration opens opportunities for children to learn about shapes and broaden their math vocabulary. You can point out that no matter the direction that a triangle faces, it is a closed shape with three sides and three angles. For children who are interested in learning about the different types of triangles, explain that some triangles have special features:
- Isosceles triangles have two sides that are the same length.
- Equilateral triangles are distinct because all three sides are the same length, and all three angles are the same size.
- Right triangles have one angle that is 90 degrees. (We include more details about triangles in this shapes handout.)
Step 4: Enjoy and talk about the designs.
Like any craft, each result is unique. To keep the math conversations going, explore why and how each jack-o’-lantern looks different. Have children look for other jack-o’-lanterns in their school and neighborhood. Instead of pointing out the shapes yourself, first listen for whether your children now spontaneously notice shape, size, and spatial features in the pumpkin designs. Then, ask questions about what they see and enjoy exploring math together!